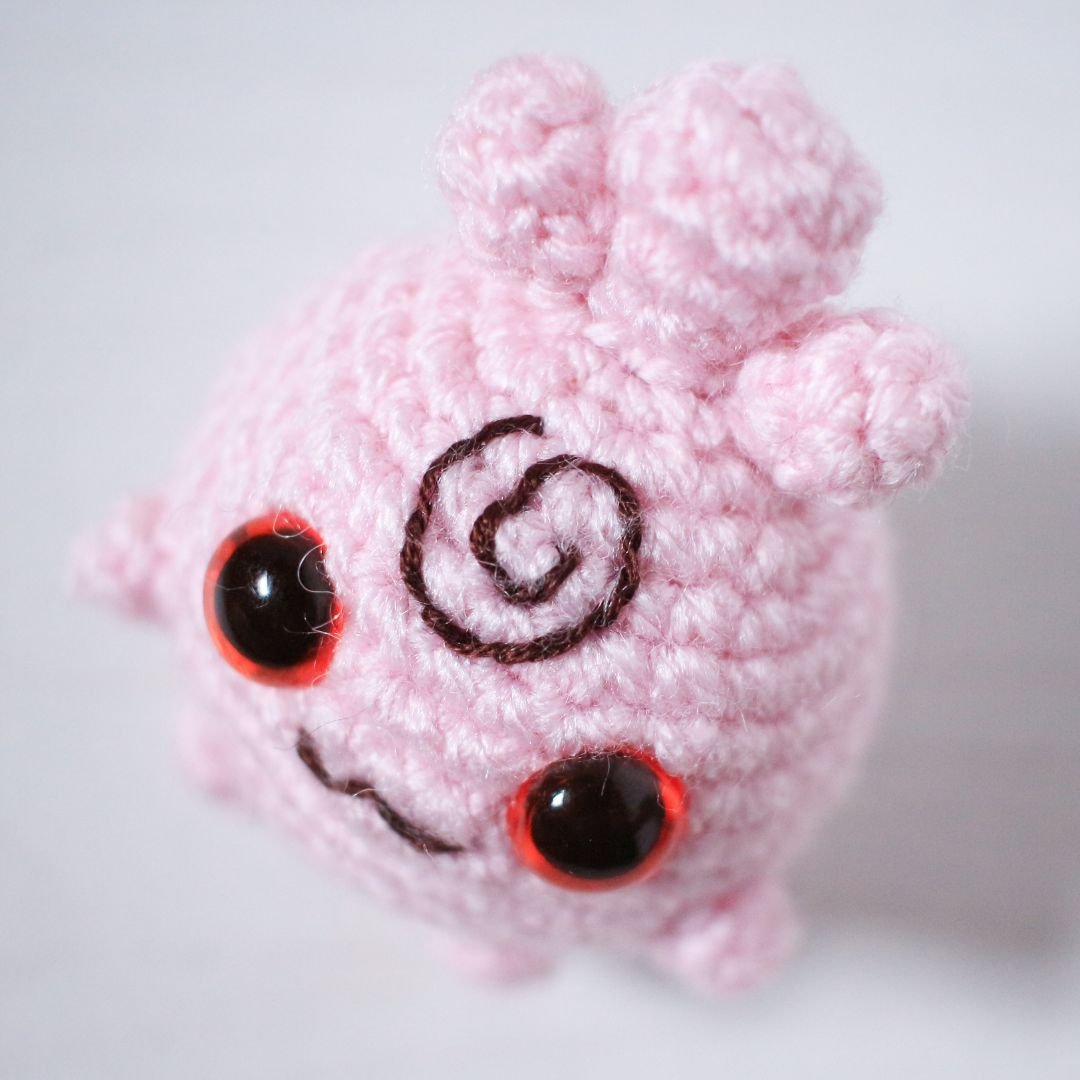
Igglybuff Amigurumi Pattern

Finally! Igglybuff has arrived!
I had originally planned on sharing this pattern weeks and weeks ago, but after filming the pattern I was looking at some of the footage and pictures and I just had this really ‘off’ feeling and realised that it just wasn’t up to par. The head/body shape was a little off. Especially the one I recreated for the tutorial. The chin was very much giving Ron Perlman! I never thought I’d see that in such an adorable little Pokemon…! Anyway… I decided to make some tweaks to the pattern, and here we are!
I’ll be honest, it’s not my favourite amigurumi that I’ve created… And I could probably still make some adjustments to make the body rounder, maybe use bigger safety eyes… I don’t know, I can’t put my finger on it. But maybe it will hit me some day in the future, and you might see an updated version.
I had planned on making shiny versions for all of my YouTube tutorials, but I can’t for the life of me work out what the difference between a shiny & normal Igglybuff is! Please help me out in the comments if you know.


Let’s get started on some useful information:
The Igglybuff pattern consists of two YouTube tutorials:
Part 1: Head & Body (Sun, 2 June at 17:00BST)
Part 2: Limbs & Embroidery (Sun, 9 June at 17:00BST)
YARN & HOOK
2mm hook
Stylecraft Special DK in Powder Pink
10mm Amber safety eyes
Brown Embroidery Floss – I’ve used Anchor 381
Polyester toy filling
Pins to place pieces before sewing together
Needles
Stitch markers (I prefer using scrap yarn as “stitch markers”)
SIZE
Igglybuff is approximately 6.5cm tall, and 4.5cm from side to side and front to back.
Weight: 15grams (this includes all materials used to make Igglybuff.
STITCHES & ABBREVIATIONS – UK ENGLISH
dc double crochet
st(s) stitch(es)
inc increase; dc 2 in one st
dec decrease; insert hook in the front loop of the next two sts, yarn over, pull through both loops, y.o. and pull through remaining two loops. This is also referred to as an invisible decrease.
y.o. yarn over
ASSEMBLY
Assemble in the same order the pattern is written. I would recommend using a photo of Igglybuff as reference for best possible outcome. Pin all the pieces in place before sewing to make sure it looks right. Sometimes adjusting a piece by just a millimetre or two makes a huge difference. Once all the pieces are attached use embroidery floss to create the smile, and the swirl on Igglybuff’s forehead.
THE PATTERN
PART ONE | HEAD & BODY
PART TWO | LIMBS & EMBROIDERY
THANK YOU & ENJOY!
Please do not reprint, sell or claim the pattern as your own.
I’ve loved creating this pattern so please don’t forget to credit the pattern designer.
I would love to see your creations! Please remember to tag me in your social media posts and use the following hashtag #loopycathrineamigurumi
For any questions about the pattern, please comment below and I will do my best to help.