
Gastly Amigurumi Pattern

I started making a Gastly at some point in 2024 thinking it would be a super quick make because it uses the same head as so many of my other patterns (Spheal, Electrode & Voltorb, Pixar Ball, Qwilfish...) But then for some reason I just got so obsessed with how to create the eyes that it just took a lot longer than it needed to. I knew I wanted to use white felt for the eyes, but I needed something sturdy holding that in place, so I decided to crochet the backing. Initially I created a circle and folded in half in order to hide the back of the safety eye. It was very just too bulky. I pinned it all together but lost interest very quickly. It collected dust for months…
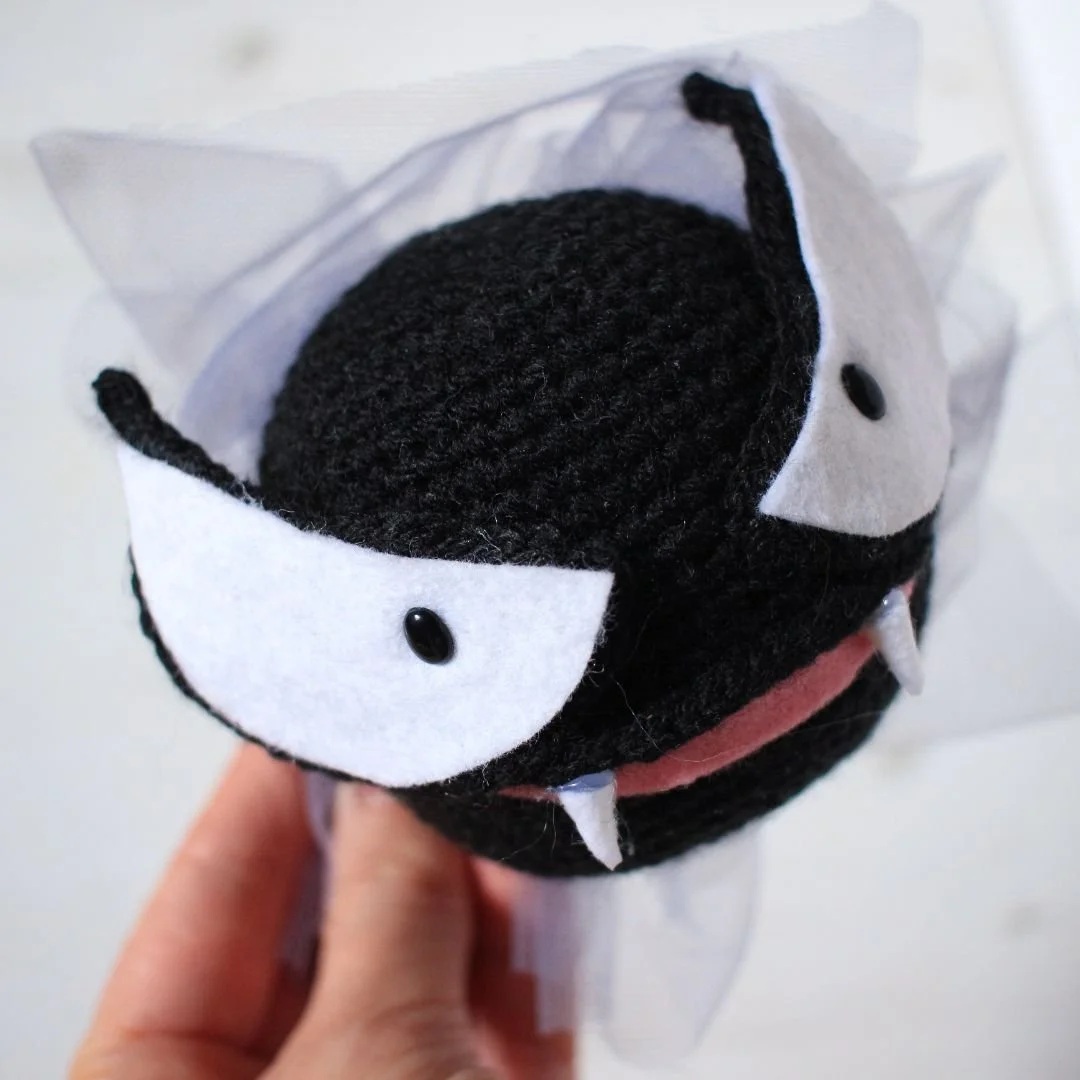
When I finally picked it up again, I decided I was going to needle felt the mouth and add on some felt teeth. It looked awful. So amateur. Needle felting is so hit an miss for me, and this one was a major miss. So in this final version I’ve recreated the eyes making a half circle so it was less bulky. I’ve created an upper lip placing pink felt underneath it, and gluing teeth underneath the upper lip, which sort of gives the illusion it has a three dimensional mouth. I’ve added some purple mesh fabric to mimic the smoke.
Overall, much better. It’s absolutely not the best Pokemon I’ve ever made, nor is it my favourite. But I started it, so I had to finish it. Hopefully there’s a Gastly stan out there who wants to make one too!
Most of my recent patterns are all on YouTube, so this is the first written pattern I’ve posted in a while. However, I am including one little video to show you how I made the eyes. If you want to show your support I would really appreciate a like and a follow over there, and every minute watched is so appreciated!
Now let’s get into the pattern! Enjoy!
YARN & HOOK
2mm hook
Stylecraft Special DK in Black (Shiny: Plum)
6.5mm Black oval safety eyes
White and Pink felt
Toy filling
PVA Glue or Glue Gun
Pins to place pieces before sewing together
Needle
Stitch markers (I prefer using scrap yarn as “stitch markers”)
Optional: Purple mesh fabric to create the smoke effect behind Gastly, and Gütermann Sew All Thread in a matching colour to sew it in place.
SIZE
Gastly is approximately 7.5cm tall and wide, 9.5cm in width if you include the eyes.
Weight: 35g (this includes all materials used to make Gastly)
STITCHES & ABBREVIATIONS – UK ENGLISH
ch chain
dc double crochet
st/sts stitch/es
inc increase; dc 2 in one st
dec decrease; insert hook in the front loop of the next two sts, yarn over, pull through both loops, y.o. and pull through remaining two loops. This is also referred to as an invisible decrease.
y.o. yarn over
ws wrong side
rs right side
ASSEMBLY
Assemble in the same order the pattern is written. I like to screenshot characters from Pokémon Go and use that for reference, and would highly recommend this for best possible outcome. Pin all the pieces in place before sewing to make sure it looks right, including the felt pieces. Once all the crocheted pieces are attached use fabric glue to attach the felt pieces.
THE PATTERN
HEAD
Yarn: Black (Shiny: Plum)
Round 1: dc 6 in Magic Ring (6)
R2: inc in all sts around (12)
R3: (dc, inc) x 6 (18)
R4: (dc, inc, dc) x 6 (24)
R5: (dc 3, inc) x 6 (30)
R6: (dc 2, inc, dc 2) x 6 (36)
R7: (dc 5, inc) x 6 (42)
R8: dc 42
R9: (dc 3, inc, dc 3) x 6 (48)
R10: dc 48
R11: (dc 7, inc) x 6 (54)
R12: dc 54
R13: (dc 4, inc, dc 4) x 6 (60)
R14-20: dc 60
R21: (dc 4, dec, dc 4) x 6 (54)
R22: dc 54
R23: (dc 7, dec) x 6 (48)
R24: dc 48
R25: (dc 3, dec, dc 3) x 6 (42)
R26: dc 42
R27: (dc 5, dec) x 6 (36)
Add stuffing
R28: (dc 2, dec, dc 2) x 6 (30)
R29: (dc 3, dec) x 6 (24)
R30: (dc, dec, dc) x 6 (18)
R31: (dc, dec) x 6 (12)
R32: dec x 6
Fasten off. Weave in loose end by inserting needle in the front loop of each st and pull tight to close the hole.
EYES
Yarn: Black (Shiny: Plum)
We’re going to start with Gastly’s left eye - the one to your right.
ch 3 – we will be working in rows, creating a half circle
Row 1 (rs): inc 2 (4), ch 1 and turn
Row 2 (ws): inc 4 (8), ch 1 and turn
Row 3 (rs): dc 8 (8), ch 1 and turn
Row 4 (ws): inc 8 (16), ch 1 and turn
Row 5 (rs): dc 16 (16), ch 1 and turn
Row 6 (ws): (dc, inc) x 8 (24), ch 1 and turn
Row 7 (rs): dc 24, ch 4, sl st in the second ch from hook, sl st in the next two chs, dc 16 evenly across the flat edge on the top of the eye
Fasten off and leave a long end to sew the piece onto the head
Let’s make Gastly’s right eye - the one to your left. Repeat Rows 1-7, finishing after dc 24 in the last row, then continue as follows:
ch 1, dc 16 evenly across the flat edge on the top of the eye, ch 4, sl st in the second ch from hook, sl st in the next two chs
Fasten off and leave a long end to sew the piece onto the head


Cut out two white felt pieces same shape as the eyes, cut a small hole for the eye. Place the felt on top of the crochet piece with the right side facing the felt, and place the eye through both pieces and fasten with the washer. When attaching the eye to the head sew in the shape of a triangle around the safety eye (see above photo).
MOUTH
Yarn: Black (Shiny: Plum)
ch 24 – we will be working one row of slip stitches to create the upper lip
Row 1: sl st in the first ch from hook, then in each of the remaining 22 chains (23)
Fasten off, and pin in place just underneath the eyes.
Cut out a pink piece of felt to mimic the open mouth, and place this underneath the upper lip to ensure it fits.
Cut out two small triangles of white felt. Using PVA glue roll these into two cone shaped teeth.
Once all other pieces are sewed in place, use PVA glue to attach the pink felt, and then glue the teeth on the bottom edge of the upper lip.
SMOKE EFFECT
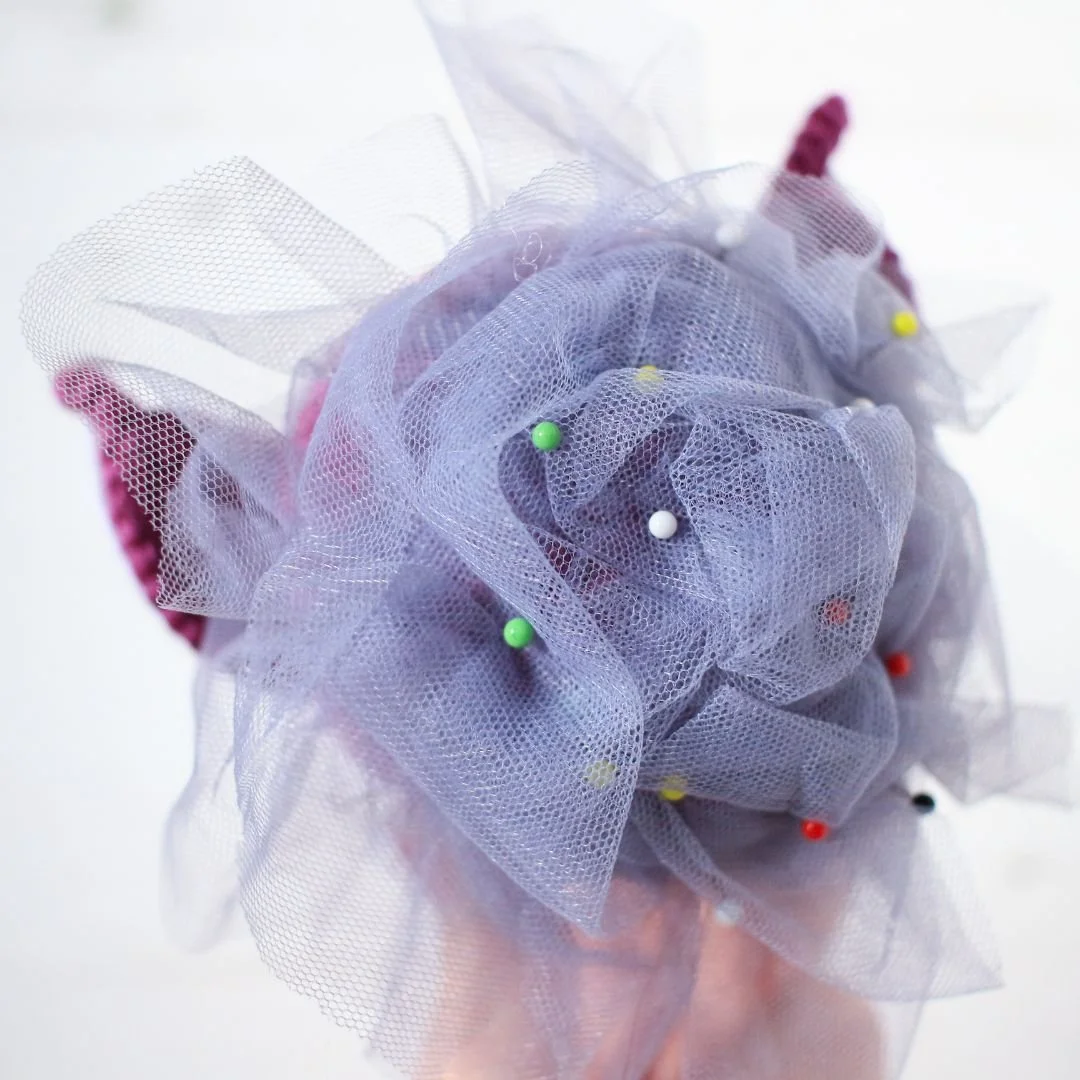
I created the smoke effect behind Gastly by cutting out two square pieces of purple mesh fabric. I’ve pinned them on the back and scrunched it up to make it look a bit messy, then used my Gütermann Sew All Thread in a matching colour to sew it in place.
THANK YOU & ENJOY!
Please do not reprint, sell or claim the pattern as your own.
I’ve loved creating this pattern so please don’t forget to credit the pattern designer when sharing online.
I would love to see your creations! Please remember to tag me in your social media posts and use the following hashtag #loopycathrineamigurumi
For any questions about the pattern, please comment below and I will do my best to help.